
Precast Building Solutions
Precast Door Frame Mould Rebate System: Single vs Double Rebate, Hinge Pocket and Alignment Guide
The rebate profile, hinge-pocket position and 90-degree alignment of a precast door frame directly affect door installation. This guide explains single and double rebate mould systems, insert positioning, casting and quality checks.
By Paras Steel Industries ·
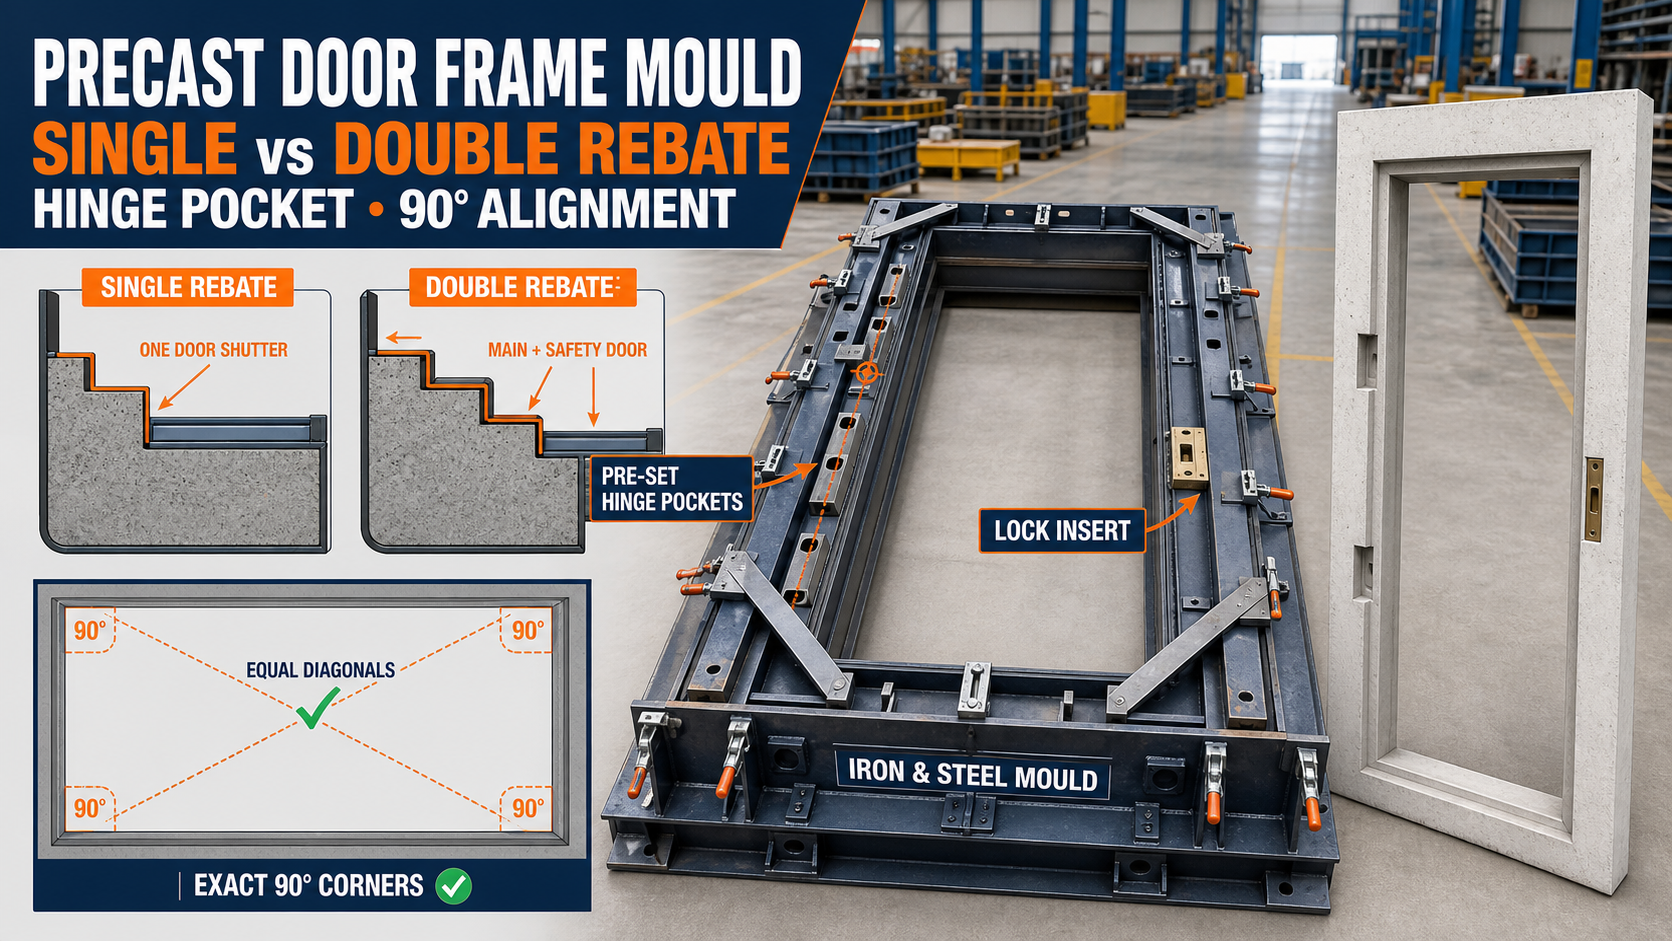
Precast Door Frame Mould Rebate System: Single vs Double Rebate, Hinge Pocket and Alignment Guide
Precast Door Frame Mould Rebate System: Single vs Double Rebate, Hinge Pocket and Alignment Guide
Precast concrete door frames, commonly called RCC chaukhat, provide a durable alternative to traditional wooden frames for residential, commercial and infrastructure projects.
The quality of a finished concrete door frame depends heavily on three mould details: the rebate profile, hinge-pocket position and overall frame alignment.
An incorrect rebate can prevent the door shutter from closing properly. Misaligned hinge pockets can make shutter installation difficult, while an out-of-square mould can produce a twisted or uneven frame.
Paras Steel Industries manufactures heavy-duty iron and steel door frame moulds with single-rebate and double-rebate options, pre-engineered hinge and lock insert provisions, diagonal bracing and quick-release tapered profiles.
What Is a Door Frame Rebate?
A rebate is the stepped section formed along the inner side of a door frame. The door shutter closes against this step.
The rebate determines:
• Door-shutter seating position • Closing clearance • Opening direction • Shutter thickness compatibility • Hinge installation position • Lock and latch alignment • Weather and privacy performance
The mould must reproduce the rebate continuously along both vertical sides and the top member of the frame.
Any variation in rebate width or depth can affect door operation at the installation site.
What Is a Single-Rebate Door Frame?
A single-rebate door frame has one stepped seating profile for one door shutter.
It is commonly used for:
• Bedroom doors • Bathroom and toilet doors • Kitchen doors • Internal room doors • Office doors • Standard residential openings • Single exterior doors
A single-rebate mould generally has a simpler cross-sectional profile than a double-rebate mould.
The rebate-forming shutter must remain straight and maintain a consistent profile throughout the full frame length.
Benefits of a Single-Rebate System
Possible benefits include:
• Simple frame profile • Faster mould cleaning • Easier shutter alignment • Reduced number of profile components • Suitability for common single-door applications • Easier inspection of rebate dimensions • Faster production changeover
The exact rebate dimensions should match the approved door-frame drawing and selected shutter thickness.
What Is a Double-Rebate Door Frame?
A double-rebate door frame contains two separate stepped seating profiles.
This arrangement may be used where two shutters are installed within the same frame, such as:
• Main door with safety door • Main shutter with wire-mesh shutter • Door with an additional screen • Selected institutional openings • Project-specific dual-shutter arrangements
Each rebate must be positioned accurately so that both shutters can operate without interfering with one another.
Benefits of a Double-Rebate System
Possible benefits include:
• Accommodation of two separate shutters • Integrated main-door and safety-door arrangement • Reduced requirement for an additional independent frame • Consistent alignment between both shutters • Neat finished opening • Suitability for customized entrance designs
A double-rebate mould requires more detailed profile fabrication and inspection than a single-rebate mould.
Single Rebate vs Double Rebate
Number of Shutters
A single rebate normally accommodates one door shutter. A double rebate may accommodate two compatible shutters.
Profile Complexity
A single-rebate profile is comparatively simple. A double-rebate profile contains an additional step and requires greater fabrication accuracy.
Mould Cleaning
The additional corners and steps in a double-rebate mould require careful cleaning after every casting cycle.
Insert Positioning
Hinge and lock provisions must be coordinated with the selected rebate and opening direction.
Demoulding
Both systems require suitable draft and a controlled release process. A detailed double-rebate profile may require greater care around concrete edges.
Application
The correct system depends on the approved architectural drawing and number of door shutters required.
A single-rebate frame should not be converted into a double-rebate frame by making site modifications after casting.
Main Components of a Door Frame Mould
A heavy-duty precast door frame mould may contain:
• Iron or IS 2062 steel casting base • Rebate-forming profile shutters • Side and top-member shutters • Removable end plates • Hinge-pocket formers • Lock and latch insert fixtures • Diagonal corner bracing • Angle stiffeners • Alignment rods • Quick-release clamps • Tapered demoulding profiles • Reinforcement-positioning guides
The exact construction depends on the frame size, cross-section and production requirements.
What Is a Hinge Pocket?
A hinge pocket is a prepared recess or insert location formed in the concrete door frame for fitting the door hinge.
A mould may use pre-engineered slot plates or removable formers to position:
• Hinge plates • Hinge fasteners • Embedded fixing components • Anchor inserts • Project-specific hinge hardware
Preformed hinge locations can reduce post-casting drilling and help maintain consistent hinge spacing across multiple frames.
Importance of Hinge-Pocket Alignment
All hinge pockets must remain on one vertical line. If one pocket moves inward, outward or sideways, the installed door shutter may bind or hang unevenly.
Before casting, verify:
• Number of hinge pockets • Distance from the top reference point • Spacing between hinge pockets • Pocket depth • Pocket width and height • Vertical centreline • Opening direction • Relationship with the rebate • Fixing security
Always take measurements from one fixed datum point instead of measuring consecutively from one hinge pocket to the next.
Measuring from a fixed reference reduces cumulative positioning errors.
Left-Hand and Right-Hand Door Openings
Door-opening direction affects the hinge side and lock side of the frame.
Before setting the mould, confirm:
• Left-hand or right-hand opening • Inward or outward opening • Hinge side • Lock-receiver side • Required rebate • Number of shutters • Finished floor reference • Approved architectural drawing
The mould setup checklist should clearly identify the opening direction before inserts are installed.
Lock and Latch Insert Positioning
The lock or latch receiver must align with the selected door shutter and hinge arrangement.
Check:
• Height from the approved datum • Horizontal position • Recess depth • Insert orientation • Relationship with the rebate • Secure fixing before casting
A loose insert can move during concrete filling or vibration and create installation problems.
Why Is 90-Degree Alignment Important?
A door frame contains two vertical jambs connected by a top member. These components must remain square.
If the upper corners are not maintained at 90 degrees, the finished frame may have:
• Unequal diagonal dimensions • Non-parallel vertical members • Uneven shutter gaps • Difficult door closing • Installation problems • Cracked corners during handling • Poor visual appearance
Heavy diagonal corner braces and angle stiffeners help hold the mould in its correct position during concrete pouring and vibration.
Door Frame Alignment Checks
Overall Width
Measure the clear opening at the top, middle and bottom. The measurements should remain within the approved tolerance.
Overall Height
Check both sides from the same bottom reference line. Unequal heights can indicate an out-of-square setup.
Diagonal Measurements
Measure both internal diagonals. If the measurements are unequal, the mould requires adjustment.
Corner Squareness
Use an engineer’s square to inspect both upper corners.
Jamb Straightness
Use a straightedge or string line to check both vertical members.
Rebate Continuity
Inspect the rebate along its full length. It should not contain sudden width or depth variation.
Surface Level
Check that the complete flat casting bed is properly levelled and supported.
Hinge Centreline
Verify that every hinge pocket follows one vertical reference line.
Mould Setup Process
A typical mould setup process includes:
1. Clean the iron or steel casting surface. 2. Remove hardened concrete from rebate corners. 3. Inspect shutters, clamps and bracing. 4. Position the single or double rebate profiles. 5. Set the required clear opening dimensions. 6. Check both diagonal measurements. 7. Secure the 90-degree corner braces. 8. Position hinge-pocket formers. 9. Install the lock and latch fixtures. 10. Apply a suitable mould-release agent. 11. Position the reinforcement cage. 12. Conduct a final dimensional inspection. 13. Record the mould setup before casting.
The setup should be inspected again after all clamps are tightened because locking pressure can change the measurements.
Reinforcement Placement
The reinforcement cage should follow the approved structural drawing for the concrete door frame.
Important checks include:
• Bar diameter • Reinforcement spacing • Concrete cover • Corner reinforcement • Cage position inside the rebate profile • Reinforcement around hinge pockets • Reinforcement near lock inserts • Secure fixing before vibration
The reinforcement must not interfere with hinge-pocket formers or touch the mould surface unintentionally.
Concrete Filling and Vibration
Concrete should be placed uniformly around the entire frame mould.
Uneven filling can shift the reinforcement cage or embedded inserts. Particular attention is required around:
• Rebate corners • Hinge pockets • Lock inserts • Upper frame corners • Narrow frame sections
A vibrator table or suitable shutter-vibration system can improve compaction when operated according to the mould and concrete requirements.
Excessive vibration can cause segregation or insert movement. Insufficient vibration can leave honeycombing and air pockets.
Demoulding Process
Demoulding should begin only after the concrete has achieved sufficient handling strength.
A typical process includes:
1. Remove external clamps and end components. 2. Release the tapered profile shutters gradually. 3. Free the rebate sections carefully. 4. Remove hinge-pocket formers in the designed direction. 5. Avoid striking the concrete corners directly. 6. Lift the frame using an approved handling method. 7. Support the frame to prevent bending. 8. Inspect the rebate and hinge pockets immediately.
Tapered quick-release profiles help create clearance between the mould and concrete.
Common Production Problems
Unequal Diagonals
This indicates that the mould may be out of square. Check corner braces, base level and locking pressure.
Inconsistent Rebate
Concrete residue, a bent profile shutter or incorrect adjustment can change the rebate dimensions.
Hinge Pockets Do Not Align
This may be caused by measurement from different reference points, loose formers or incorrect opening-direction setup.
Broken Rebate Corners
Possible causes include premature demoulding, inadequate release agent, insufficient draft or uncontrolled hammering.
Honeycombing Around Inserts
Dense reinforcement, trapped air or insufficient vibration can produce voids around hinge and lock fixtures.
Twisted Door Frame
An uneven mould base, inaccurate bracing or improper product storage can cause twisting.
Slurry Leakage
Loose joints and damaged contact surfaces can allow cement slurry to escape, affecting edges and dimensions.
Quality-Control Checklist
After demoulding, inspect:
• Overall frame height • Clear opening width • Internal diagonals • Corner squareness • Jamb straightness • Rebate width and depth • Rebate continuity • Hinge-pocket dimensions • Hinge-pocket spacing • Lock-receiver position • Concrete surface finish • Honeycombing • Cracks and damaged edges • Reinforcement cover • Product identification
A trial fitting with the intended hinge hardware can help verify insert compatibility before full-scale production.
Cleaning and Maintenance
After every casting cycle:
• Remove concrete residue. • Clean rebate-forming corners. • Clean hinge and lock formers. • Inspect tapered profiles. • Check diagonal braces. • Inspect angle stiffeners and welds. • Examine clamps and locking points. • Lubricate approved moving components. • Repair slurry-leakage joints. • Verify dimensions periodically. • Apply anti-rust protection where required.
Do not use cleaning tools that scratch or bend precision rebate surfaces.
Factors to Check Before Buying
Before ordering a precast door frame mould, provide:
• Approved frame drawing • Single or double rebate requirement • Overall frame dimensions • Clear opening dimensions • Frame cross-section • Rebate width and depth • Door-shutter thickness • Left-hand or right-hand opening • Hinge-pocket details • Lock and latch insert details • Reinforcement drawing • Required number of moulds • Expected daily production • Vibration method • Required dimensional tolerance
The buyer should also discuss iron or steel plate thickness, diagonal bracing, taper arrangement and customization requirements.
Conclusion
The rebate system, hinge-pocket position and mould alignment determine whether a precast concrete door frame will fit and operate correctly at the project site.
A single-rebate mould is generally used for one shutter, while a double-rebate system can accommodate compatible dual-shutter arrangements. Both require accurate 90-degree bracing, equal diagonals and properly positioned hardware inserts.
Paras Steel Industries manufactures IS 2062 heavy-duty iron and steel door frame moulds with single and double rebate options, hinge and lock provisions, diagonal bracing and quick-release profiles. Buyers should provide complete architectural and structural drawings before mould manufacturing begins.