
Precast Mould Maintenance
Concrete Slurry Leakage From Precast Moulds: Causes, Prevention and Repair
Concrete slurry leakage can cause honeycombing, poor edges, dimensional errors and material waste in precast production. This guide explains how to identify, prevent and repair leakage in heavy-duty iron precast moulds.
By Paras Steel Industries ·
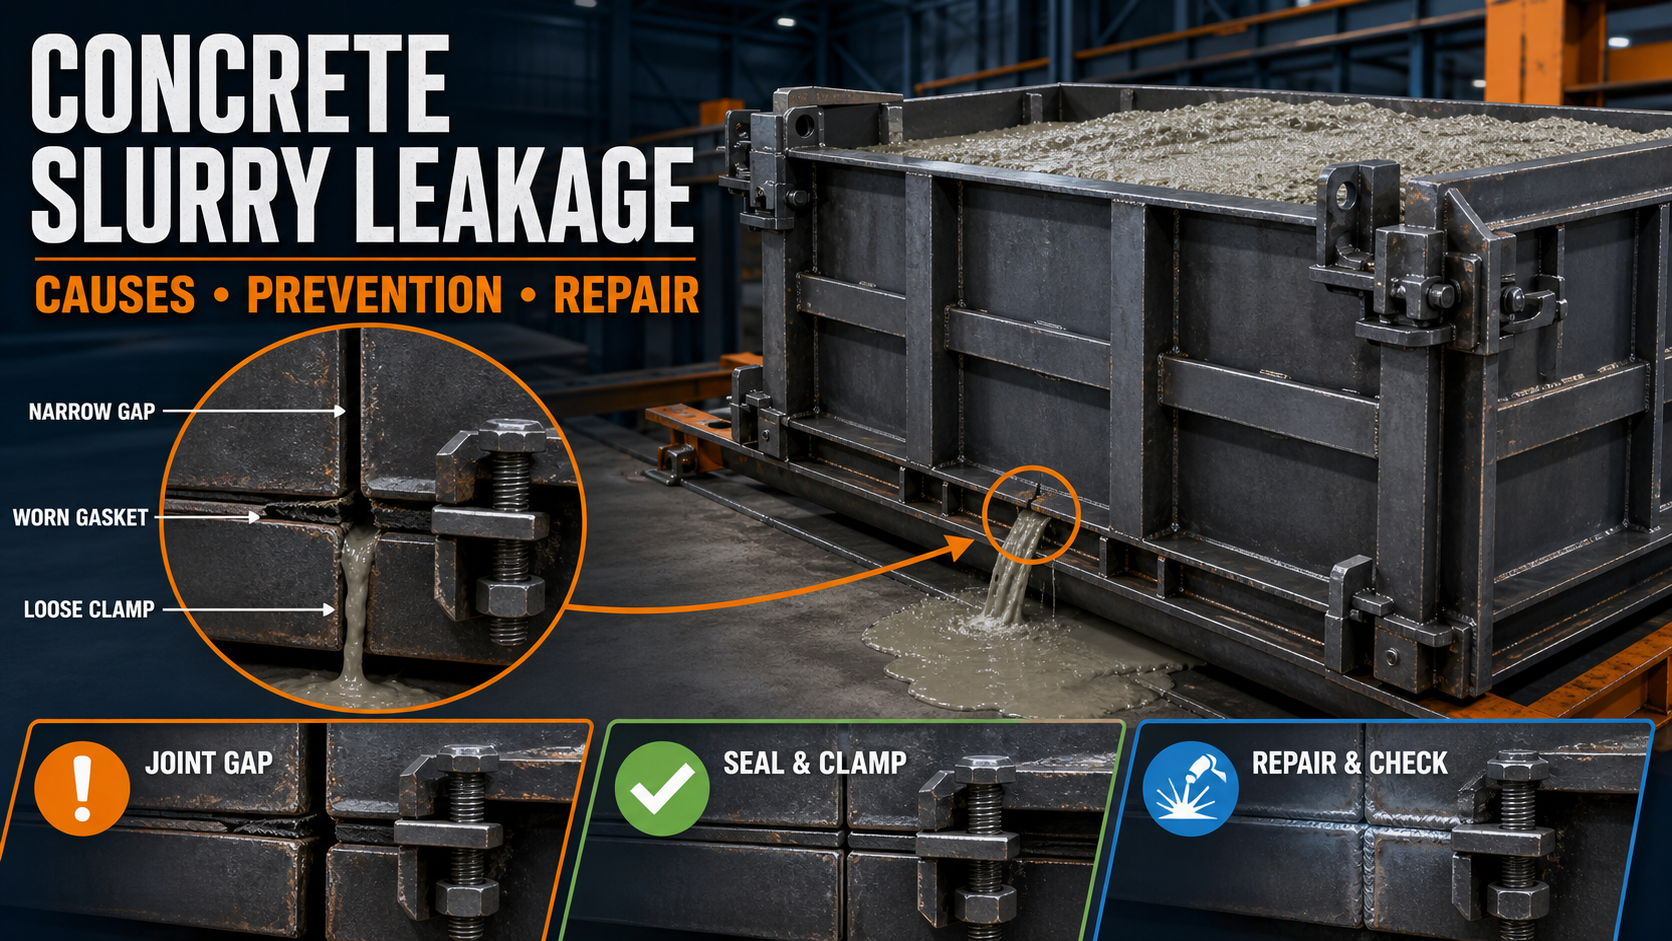
Concrete Slurry Leakage From Precast Moulds: Causes, Prevention and Repair
Concrete Slurry Leakage From Precast Moulds: Causes, Prevention and Repair
Concrete slurry leakage is a common production problem in precast plants. It occurs when cement paste, water and fine particles escape through gaps in the mould during casting or vibration.
Even a small leakage point can result in damaged edges, honeycombing, dimensional variation and an uneven surface finish. Continuous leakage also increases cleaning time, material waste and mould maintenance costs.
Heavy-duty iron precast moulds can control slurry leakage effectively when their plates, joints, locks, gaskets and supporting frames are properly designed and maintained.
What Is Concrete Slurry Leakage?
Concrete slurry is the fluid mixture of cement paste, water and fine aggregates present in fresh concrete. During pouring and vibration, this material moves toward openings in the mould.
If a gap is present between two iron plates, at a shutter joint, near a corner or around an insert, the slurry may escape from the mould.
Coarse aggregates generally remain inside while cement paste and water leak out. This changes the concrete composition around the affected area and may reduce the quality of the finished precast product.
Why Slurry Leakage Must Not Be Ignored
Slurry leakage is not only a housekeeping issue. It can directly affect product quality and production efficiency.
Possible consequences include:
• Honeycombing near joints and corners • Broken or weak product edges • Loss of cement paste • Uneven colour and surface texture • Dimensional inaccuracies • Visible joint lines • Reduced concrete cover • Difficult mould cleaning • Increased material waste • Longer finishing and repair time • Faster corrosion around damaged mould areas • Rejection of finished precast products
Frequent leakage usually indicates a problem with mould alignment, joint sealing, locking pressure or structural rigidity.
Main Causes of Concrete Slurry Leakage
1. Gaps Between Mould Plates
Gaps between two shutter plates are among the most common causes of leakage. These gaps may develop because of incorrect assembly, wear, poor fabrication or damage during handling.
Even a narrow gap can allow cement paste to escape when the concrete is vibrated.
2. Warped or Bent Iron Plates
An iron mould plate can bend because of concrete pressure, incorrect lifting, excessive vibration or inadequate structural stiffeners.
When a plate loses its straightness, it may no longer sit properly against the adjoining shutter. This creates an uneven joint through which slurry can escape.
3. Weak or Insufficient Stiffeners
The mould plate requires properly designed angle, C-channel or H-beam stiffeners to resist concrete pressure.
If the stiffeners are undersized or placed too far apart, the iron plate may bulge during casting. A joint that appears closed before pouring may open after the mould is filled.
4. Loose Locks and Clamps
Mould locks, bolts, wedges and clamps must apply sufficient and uniform closing pressure.
A worn or loose locking system may allow shutters to separate during vibration. Leakage commonly appears near locks when closing pressure is not distributed correctly.
5. Worn or Damaged Gaskets
Rubber, foam or other suitable sealing materials may be installed at mould joints. These seals can become compressed, torn, hardened or displaced after repeated use.
A damaged gasket cannot fill the joint properly, which allows slurry to escape.
6. Damaged Welded Joints
Cracks, pinholes and incomplete welds can develop around mould corners, inserts and supporting components.
Repeated vibration and rough handling may enlarge small weld defects. Slurry can then leak through the damaged joint.
7. Improper Mould Assembly
Dust, hardened concrete, rust or debris trapped between joining surfaces can prevent the shutters from closing completely.
Incorrect positioning of bolts, pins, wedges or clamps can also create an uneven gap.
8. Uneven Casting Platform
A heavy-duty iron mould must be placed on a level and stable casting surface.
If the foundation or supporting platform is uneven, the mould frame can twist. This may create gaps at the base, corners or shutter joints.
9. Excessive Concrete Vibration
Vibration is necessary for concrete compaction, but excessive or uncontrolled vibration can increase slurry pressure at mould joints.
Incorrectly positioned shutter vibrators may also loosen clamps and locking mechanisms.
10. Highly Fluid Concrete Mix
Concrete with excessive water or very high fluidity can penetrate small joint openings more easily.
Leakage should not automatically be solved by changing the concrete mix. Both the mix design and mould condition should be checked.
11. Improper Application of Release Agent
Excessive mould release agent may collect near joints and sealing surfaces. This can prevent some gaskets or sealants from making proper contact.
Release agent should be applied in a thin and uniform layer without flooding the mould corners.
12. Incorrectly Installed Inserts
Lifting anchors, sleeves, pipes, block-outs and other inserts may create leakage points if their openings are not sealed correctly.
Insert positions should be checked before every casting cycle.
How to Find the Exact Leakage Point
The first step in repairing leakage is identifying its actual source.
Clean the mould completely and inspect it in good lighting. Pay special attention to:
• Bottom joints • Vertical shutter joints • Corners • Hinges and locks • Bolt holes • Insert openings • Previous repair areas • Welded seams • Warped plates • Damaged gaskets
A dry trial assembly can reveal visible gaps before production begins. For difficult leakage points, a controlled water test may help identify openings.
The mould should be empty, safely supported and thoroughly dried after testing to prevent corrosion.
How to Prevent Slurry Leakage
Clean the Mould Before Assembly
Remove hardened concrete, dust, rust and old sealing material from all contact surfaces.
A clean joint allows plates and gaskets to sit correctly.
Check Mould Alignment
Ensure that the mould is level, square and properly supported. Measure critical dimensions before tightening all locks.
Misalignment should be corrected instead of forcing the shutters closed.
Inspect Locks and Clamps
Check bolts, wedges, clamps and locking mechanisms before every production cycle.
Replace worn components and adjust the locks so that pressure is distributed evenly along the joint.
Use Suitable Sealing Material
A suitable gasket, foam strip or industrial sealing material can help close minor joints.
The selected material should be compatible with concrete, mould release agent, operating temperature and repeated production cycles.
Temporary sealing materials should not be treated as a permanent solution for damaged plates or weak mould frames.
Maintain Proper Stiffener Support
Angle sections, C-channels and H-beams should be selected according to the mould size and casting pressure.
Properly positioned stiffeners reduce plate movement and help the mould joints remain closed during vibration.
Control the Vibration Process
Use the correct vibrator type, location and operating duration.
Excessive vibration should be avoided because it can loosen locks, increase joint pressure and cause aggregate segregation.
Apply Release Agent Correctly
Clean the mould surface and apply a thin, uniform coat of suitable mould release agent.
Avoid excessive accumulation around joints, locks and gasket surfaces.
Check the Casting Platform
Place the iron mould on a level, stable and load-bearing platform.
All supporting points should make proper contact so that the mould frame does not twist after filling.
Conduct a Pre-Pour Inspection
Before pouring concrete, confirm that:
• Every shutter is correctly positioned • All locks are completely engaged • Gaskets are clean and undamaged • Inserts are properly sealed • The mould is level • No visible gaps are present • Vibrators are securely mounted • Required dimensions are correct
A short inspection can prevent costly product rejection.
How to Repair Slurry Leakage From an Iron Precast Mould
1. Minor Joint Gap Repair
For a minor gap, begin by cleaning both contact surfaces. Check whether dirt, hardened concrete or damaged sealing material is preventing closure.
Replace the gasket if necessary and adjust the clamp or lock to restore uniform pressure.
Do not use excessive force to close a joint because this can damage the shutter or locking system.
2. Worn Gasket Replacement
Remove the old gasket and clean the mounting surface.
Install a gasket of suitable width, thickness and hardness. Ensure that it remains continuous around corners and does not twist during installation.
Close the mould and verify that the gasket is compressed uniformly.
3. Loose Lock or Clamp Repair
Inspect the lock for worn pins, elongated holes, bent components and damaged threads.
Repair or replace the affected components. Adjust the mechanism so that the joint closes evenly without placing excessive pressure at a single point.
4. Bent Plate Repair
A slightly bent plate may require controlled straightening with suitable workshop equipment.
Before straightening, identify why the plate deformed. If inadequate reinforcement caused the problem, the stiffener arrangement may also require modification.
Severely damaged plates should be evaluated for replacement.
5. Weld Crack Repair
Remove concrete residue, paint, rust and damaged weld material from the affected area.
The crack should be repaired by a qualified fabricator using an appropriate welding procedure. After welding, check the plate for heat distortion and inspect the joint before returning the mould to production.
6. Corner Leakage Repair
Corner leakage may result from an incomplete weld, plate distortion or poor joint contact.
Inspect both the inside and outside of the corner. Repair the structural defect and confirm that the internal casting surface remains smooth.
7. Insert Leakage Repair
Check the clearance around sleeves, anchors and block-outs.
Use a suitable sealing arrangement that keeps the insert stable during pouring and vibration. The seal should not affect the specified position or dimensions of the insert.
8. Base Joint Repair
Leakage from the bottom joint may be caused by an uneven platform, bent base frame or damaged sealing strip.
First level the mould and check the supporting frame. Repairing only the visible gap without correcting frame distortion may provide only temporary relief.
Temporary Repair vs Permanent Repair
Temporary sealing may help complete an urgent casting cycle, but it should not replace proper maintenance.
Temporary measures may be suitable for a very small non-structural joint gap. They are not suitable for:
• Cracked mould frames • Broken welds • Severely bent plates • Damaged lifting points • Failed locking systems • Major structural deformation • Repeated leakage at the same location
Recurring leakage indicates that the underlying cause has not been corrected.
Common Leakage Repair Mistakes
Applying Sealant Without Cleaning
Sealant may not bond properly to surfaces covered with oil, concrete residue, rust or dust.
Ignoring Plate Distortion
Filling a gap without straightening a bent plate does not correct the structural problem.
Over-Tightening Locks
Excessive tightening may bend the shutter, damage threads or place uneven pressure on the mould frame.
Welding Without Controlling Heat
Uncontrolled welding can distort the casting surface and create new joint gaps.
Using the Wrong Gasket Thickness
A gasket that is too thin may not seal the joint. A gasket that is too thick may prevent correct mould closure and alter product dimensions.
Continuing Production With Damaged Locks
A temporary adjustment cannot compensate for a severely worn or broken locking component.
Daily Precast Mould Leakage Checklist
Before Casting:
• Clean all contact surfaces • Check mould alignment • Inspect gaskets and seals • Tighten locks uniformly • Verify insert positions • Check the casting platform • Look for visible gaps • Confirm vibrator mounting
During Casting:
• Monitor all mould joints • Control concrete pouring speed • Avoid excessive vibration • Stop and inspect abnormal leakage • Do not stand near unsafe pressurised joints
After Demoulding:
• Remove concrete residue carefully • Inspect leakage marks • Check welds and stiffeners • Lubricate moving mechanisms where appropriate • Record recurring leakage locations • Complete repairs before the next casting cycle
How Mould Design Helps Prevent Leakage
A well-designed heavy-duty iron precast mould prevents leakage through structural rigidity and accurate joint construction.
Important design features include:
• Correct iron plate thickness • Suitable angle, C-channel or H-beam stiffeners • Proper stiffener spacing • Machined or accurately fabricated joint surfaces • Strong and adjustable locking systems • Replaceable gasket arrangements • Adequate base-frame support • Accessible cleaning areas • Correctly positioned lifting points • Controlled welding and fabrication
The mould must remain properly aligned not only when empty but also when filled with concrete and subjected to vibration.
When Should a Precast Mould Be Replaced?
Repair is often possible, but replacement or major rebuilding may be more economical when:
• The main frame is permanently twisted • Casting plates are severely worn • Multiple weld cracks appear repeatedly • Locks and hinges cannot maintain alignment • Product dimensions remain inconsistent • Repair downtime becomes excessive • Leakage returns after repeated repairs
The repair cost should be compared with the expected remaining service life and production losses.
Final Conclusion
Concrete slurry leakage from precast moulds is commonly caused by joint gaps, bent iron plates, weak stiffeners, damaged gaskets, loose locks, weld defects, excessive vibration or an uneven casting platform.
The best prevention method is regular cleaning, alignment checking, gasket inspection, controlled vibration and timely maintenance of locks and welded joints.
Leakage should be repaired at its source. Simply covering a visible gap may provide temporary relief but will not solve structural deformation or locking problems.
Paras Steel Industries manufactures customised heavy-duty iron precast moulds with suitable plate thickness, structural stiffeners, locking arrangements and joint details according to the required product dimensions and production capacity.
For a customised mould quotation, share your precast product drawing, dimensions, daily production target and preferred operating system with Paras Steel Industries.