
Precast Machinery Guide
Concrete Mixer Ring Gear Maintenance: Alignment, Lubrication and Noise Diagnosis
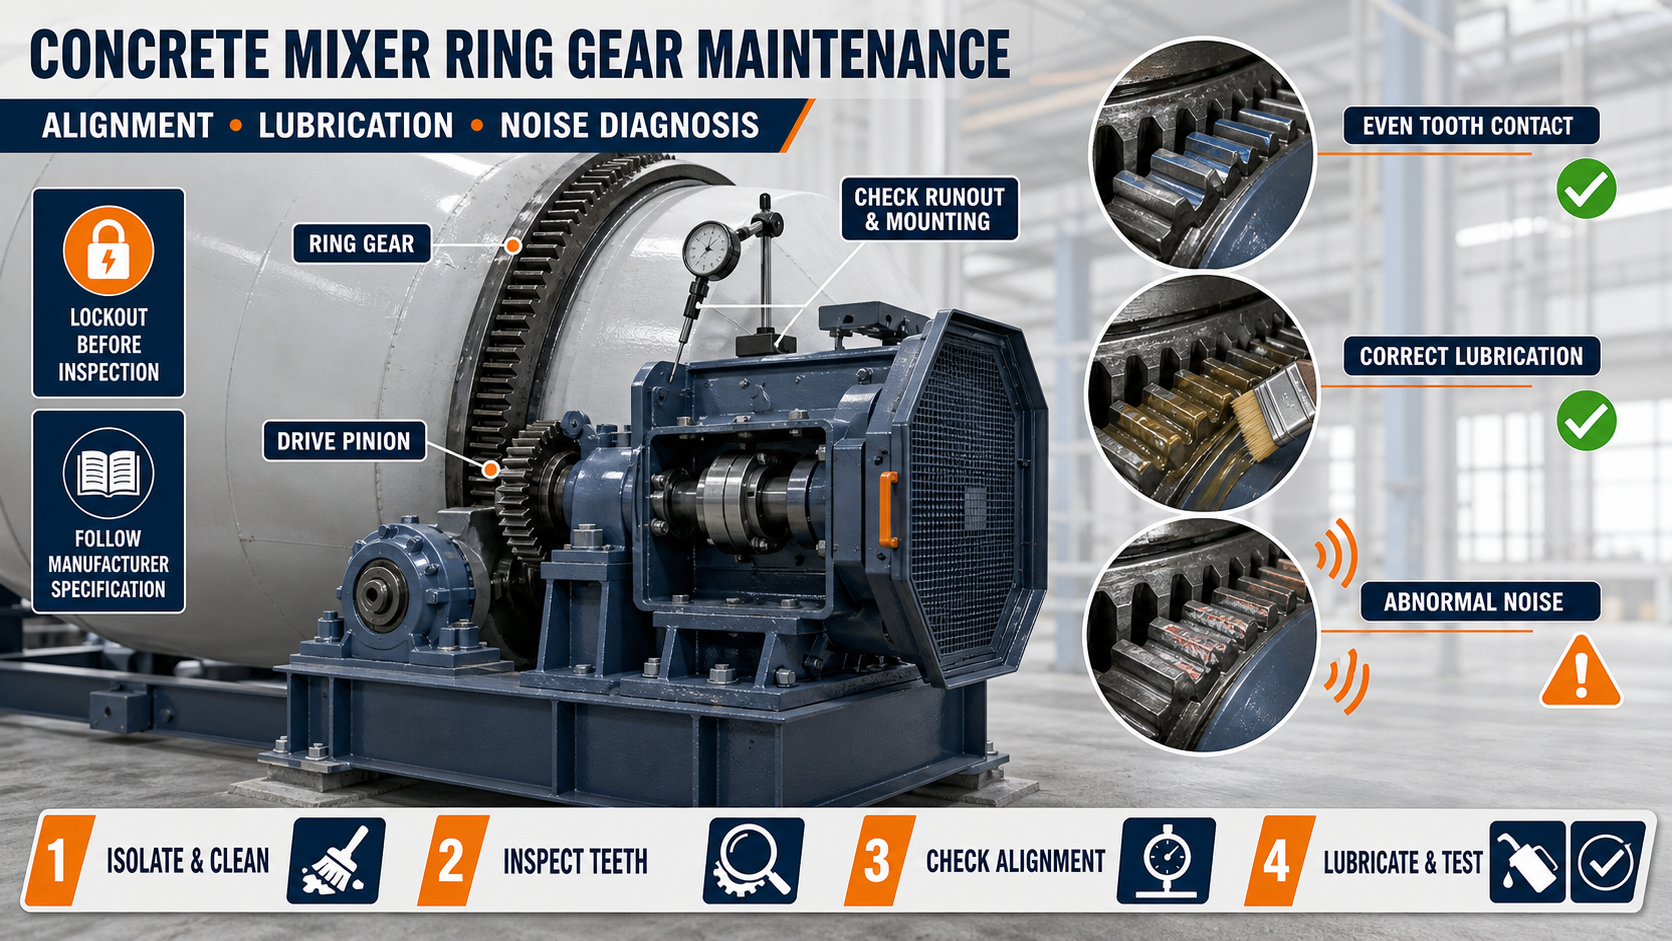
Regular concrete mixer ring gear maintenance helps reduce abnormal noise, uneven tooth wear and unexpected machine stoppages. This guide explains safe inspection, gear and pinion alignment, correct lubrication and common fault diagnosis.
By Paras Steel Industries ·
Concrete Mixer Ring Gear Maintenance: Alignment, Lubrication and Noise Diagnosis
Concrete Mixer Ring Gear Maintenance Guide
A concrete mixer ring gear transfers power from the motor and gearbox to the mixer drum or mixing assembly. It normally operates together with a smaller drive pinion. Correct contact between these components is essential for smooth and reliable mixer operation.
Poor alignment, insufficient lubrication, loose mounting bolts or damaged gear teeth can produce abnormal noise, vibration and accelerated wear. Ignoring these warning signs may damage the ring gear, pinion, bearings, gearbox or supporting structure.
This guide explains concrete mixer ring gear maintenance, including safety isolation, alignment checks, lubrication and noise diagnosis.
What Is a Concrete Mixer Ring Gear?
A ring gear is a large circular gear fitted around the mixer drum or rotating mixing assembly. A smaller drive pinion engages with the ring gear and transfers rotational power from the drive system.
A typical system may include:
• Fabricated or cast ring gear • Drive pinion • Electric motor • Gearbox • Drive shaft • Bearings • Gear mounting brackets • Alignment supports • Protective guard • Lubrication arrangement • Mixer drum or rotating assembly
The exact design varies according to the concrete mixer model and production capacity.
Why Ring Gear Maintenance Is Important
The ring gear and pinion operate under repeated loads. Incorrect contact between their teeth can concentrate pressure in a small area and cause rapid wear.
Regular maintenance can help:
• Reduce abnormal operating noise • Maintain smoother rotation • Prevent uneven gear-tooth wear • Reduce vibration • Protect bearings and gearbox components • Detect loose fasteners early • Reduce unplanned production stoppages • Extend the service life of the drive system
Maintenance should follow the mixer and gear manufacturer’s instructions.
Safety Before Inspection
Ring gears and pinions can cause severe injury. Inspection must not begin until the mixer is completely isolated.
Before maintenance:
1. Stop the concrete mixer. 2. Disconnect and isolate the electrical supply. 3. Apply the plant’s lockout and tagout procedure. 4. Wait until all rotating components have stopped. 5. Prevent accidental drum movement. 6. Release stored mechanical or hydraulic energy. 7. Secure the drum or mixing assembly where required. 8. Use appropriate personal protective equipment. 9. Allow only trained personnel to remove the gear guard.
Never inspect, clean or lubricate the gear while the mixer is operating unless the equipment has a specifically designed automatic system that permits it.
Clean Before Inspecting
Heavy grease, cement dust and concrete buildup can hide damaged gear teeth and loose fasteners.
Before inspection:
• Remove loose dust and debris • Clean hardened material carefully • Keep cleaning tools away from electrical parts • Avoid damaging the tooth surface • Collect old grease according to site procedures • Clean the gear guard • Inspect drainage and contamination points
Do not use uncontrolled hammering or sharp tools that can damage the ring gear.
Inspect the Ring Gear Teeth
Rotate the secured mixer gradually using the approved maintenance procedure so that the complete ring gear can be inspected.
Look for:
• Uneven polishing • Pitting • Chipped teeth • Cracks • Burrs • Scoring • Excessive wear • Rust • Damaged tooth edges • Metal particles in the lubricant • Areas with missing lubrication
Mark suspicious areas and record their location for further assessment.
Inspect the Drive Pinion
The pinion may wear faster because it has fewer teeth and completes more rotations.
Check the pinion for:
• Uneven tooth contact • Sharp or worn tooth profiles • Chipping • Cracks • Surface pitting • Loose shaft mounting • Damaged key or locking arrangement • Bearing play • Lubrication condition • Misalignment with the ring gear
Replacing only one component without identifying the cause of wear may damage the new part.
Checking Ring Gear and Pinion Alignment
The ring gear and pinion must be aligned so that the load is distributed properly across the tooth faces. Incorrect alignment can cause tooth-edge contact and abnormal noise.
Inspect:
• Axial alignment • Radial position • Gear and pinion parallelism • Tooth contact pattern • Backlash • Ring gear runout • Pinion-shaft condition • Bearing movement • Drive-base stability • Gearbox mounting
Required alignment and backlash values depend on the mixer design and gear specification. Always follow the equipment manufacturer’s approved measurements.
Do not use general assumed values for every mixer.
Check the Tooth Contact Pattern
A suitable contact-marking method can help show where the pinion contacts the ring gear.
The contact pattern should be evaluated by qualified maintenance personnel. An abnormal pattern may indicate:
• Pinion positioned too close • Pinion positioned too far away • Shafts not parallel • Ring gear runout • Worn bearings • Distorted mounting brackets • Loose drive-system fasteners • Damaged gear teeth
After making an adjustment, rotate the system through the approved maintenance procedure and check the pattern again.
Ring Gear Runout
A ring gear that does not rotate concentrically may move closer to and farther away from the pinion during every revolution. This can create alternating tight and loose engagement.
Possible causes include:
• Incorrect ring gear installation • Loose mounting bolts • Distorted supporting structure • Drum deformation • Dirt between mounting surfaces • Damaged gear segments • Uneven fastener tightening
Runout should be measured using suitable instruments and compared with the manufacturer’s tolerance.
Inspect Mounting Bolts and Supports
Loose fasteners can change alignment and create knocking or rattling sounds.
Check:
• Ring gear mounting bolts • Pinion and gearbox mounting bolts • Motor mounting bolts • Bearing-housing fasteners • Support brackets • Locking devices • Welded joints • Base-frame condition
Fasteners should be tightened using the approved sequence and specified torque. Do not apply assumed torque values.
Correct Lubrication of the Ring Gear
Lubrication creates a protective film between the ring gear and pinion teeth. It helps reduce friction, heat and surface damage.
For proper lubrication:
• Use the lubricant recommended by the equipment manufacturer • Clean the gear before applying fresh lubricant • Apply lubricant evenly across the working tooth surfaces • Avoid excessive buildup • Follow the specified lubrication frequency • Keep cement dust and water away from the gear • Inspect lubricant condition regularly • Maintain automatic lubrication systems where provided
Different gear materials and operating conditions may require different lubricants. Do not mix incompatible products.
Problems Caused by Insufficient Lubrication
Insufficient lubrication may lead to:
• Dry metallic noise • Rapid tooth wear • Surface scoring • Excessive heat • Pitting • Increased drive load • Metal particles around the gear • Shortened component life
If the gear repeatedly becomes dry, inspect the lubrication method and application interval.
Problems Caused by Excessive Lubrication
More grease does not always provide better protection. Excessive lubricant can:
• Attract cement dust and sand • Create an abrasive paste • Hide cracks and tooth damage • Spread onto nearby components • Increase cleaning requirements • Contaminate the factory floor • Reduce the effectiveness of visual inspection
Apply only the recommended quantity using the approved method.
Protecting the Gear From Contamination
Concrete production areas contain cement dust, aggregates and water. These materials can contaminate open gear lubrication.
To reduce contamination:
• Keep the protective guard installed • Repair damaged covers • Clean the area regularly • Prevent concrete slurry from reaching the gear • Check seals around nearby components • Avoid spraying water directly onto the gear • Store lubricant in sealed containers • Use clean lubrication tools
A mixture of grease and aggregate particles can accelerate abrasive wear.
Diagnosing Abnormal Ring Gear Noise
Different sounds can indicate different problems. Operators should record when the sound occurs and whether it changes during each drum rotation.
Rhythmic Knocking Sound
A repeated knock at the same point during every revolution may indicate:
• Damaged ring gear teeth • Loose mounting bolts • Excessive runout • A deformed gear section • Debris caught between teeth
Continuous Grinding Sound
Grinding may be associated with:
• Insufficient lubrication • Incorrect gear engagement • Damaged tooth surfaces • Contaminated lubricant • Worn bearings • Pinion misalignment
High-Pitched Whining Sound
Possible causes include:
• Incorrect backlash • Excessively tight engagement • Shaft misalignment • Bearing problems • Abnormal motor or gearbox operation
Rattling Sound
Rattling may result from:
• Excessive backlash • Loose guards • Loose mounting bolts • Worn keys or couplings • Gearbox or bearing movement
Intermittent Noise
Noise that changes during one complete revolution can indicate ring gear runout, a damaged gear section or uneven tooth contact.
Noise should not be diagnosed only by sound. A complete mechanical inspection is required.
Check the Bearings and Drive Shaft
Ring gear noise may originate from another drive-system component.
Inspect:
• Pinion-shaft bearings • Gearbox bearings • Drum support bearings • Shaft alignment • Bearing lubrication • Couplings • Keys and locking components • Unwanted axial or radial movement
A worn bearing can change the pinion position and create poor gear engagement.
Check the Motor and Gearbox
If the ring gear appears normal, inspect the motor and gearbox.
Warning signs include:
• Motor overheating • Repeated electrical tripping • Gearbox oil leakage • Unusual gearbox noise • Excessive vibration • Loose mounting bolts • Coupling wear • Uneven rotation • Abnormal electrical current
Electrical testing should only be performed by qualified personnel.
Step-by-Step Troubleshooting Process
Use the following sequence when abnormal noise or wear is detected:
1. Stop and isolate the mixer. 2. Secure all rotating parts. 3. Clean the ring gear and pinion. 4. Inspect the complete ring gear circumference. 5. Check the pinion teeth and shaft. 6. Inspect all mounting bolts and brackets. 7. Measure runout using suitable equipment. 8. Check backlash and tooth contact. 9. Inspect bearings, motor and gearbox. 10. Verify the lubricant type and application. 11. Correct identified faults. 12. Reinstall the protective guard. 13. Perform a controlled test run. 14. Record the inspection and repair.
Change one major adjustment at a time so that its effect can be properly evaluated.
Common Maintenance Mistakes
Lubricating Without Cleaning
Applying new grease over contaminated material can trap abrasive dust against the gear teeth.
Operating Without a Guard
An open gear creates a serious safety risk and allows contamination to reach the tooth surfaces.
Ignoring Repeated Noise
A recurring sound may indicate a developing alignment, bearing or gear-tooth problem.
Adjusting Backlash by Guesswork
Incorrect adjustment may create tight engagement or excessive clearance. Use approved measuring methods.
Replacing the Pinion Without Checking Alignment
A new pinion may wear quickly if the ring gear, bearings or mounting structure remain misaligned.
Using Unapproved Lubricant
An unsuitable lubricant may not provide adequate protection under the mixer’s operating conditions.
Preventive Maintenance Checklist
Daily or Shift Checks
• Listen for abnormal noise • Observe vibration • Check the protective guard • Look for loose components • Inspect visible lubricant condition • Check for concrete or slurry contamination
Scheduled Checks
• Clean the ring gear and pinion • Inspect every gear tooth • Check mounting bolts • Verify tooth contact • Measure backlash and runout • Inspect bearings and shafts • Check motor and gearbox mounts • Apply the approved lubricant • Record wear and repairs
Maintenance frequency should be based on operating hours, production conditions and manufacturer recommendations.
When Should the Mixer Be Stopped?
Stop operating the mixer if you observe:
• Cracked or broken gear teeth • Loose ring gear mounting • Severe grinding or knocking • Excessive gear movement • Damaged protective guard • Overheated bearings • Repeated motor tripping • Major lubricant contamination • Cracked support brackets • Sudden increase in vibration
The mixer should return to service only after the problem has been corrected and verified.
Post-Maintenance Test
After completing maintenance:
1. Confirm that all tools have been removed. 2. Check that fasteners are secured. 3. Reinstall all protective guards. 4. Clear personnel from the machine. 5. Remove lockout only through the approved procedure. 6. Run the mixer under controlled conditions. 7. Listen for abnormal noise. 8. Observe the gear and drive-system behaviour from a safe position. 9. Stop the machine if the fault continues. 10. Record the final result.
Conclusion
Concrete mixer ring gear maintenance requires regular cleaning, correct lubrication, accurate ring gear and pinion alignment and early diagnosis of abnormal noise.
Rhythmic knocking, grinding, whining or rattling should never be ignored. The cause may include damaged teeth, incorrect backlash, excessive runout, loose fasteners, contaminated lubricant or worn bearings.
A planned maintenance programme can help improve mixer reliability, reduce unplanned stoppages and protect the complete drive system. All alignment measurements, lubricant selection and repair procedures should follow the concrete mixer and component manufacturer’s approved instructions.