
Precast Machinery Guide
Concrete Mixer Discharge Gate Leakage: Seal Wear, Closing Alignment and Slurry Buildup Guide
A leaking concrete mixer discharge gate can waste cement slurry, contaminate the plant floor and produce inconsistent batches. Common causes include hardened buildup, worn seals, distorted gate plates and incorrect closing alignment. This guide explains safe inspection, cleaning, adjustment and maintenance of an all-steel mixer discharge system.
By Paras Steel Industries ·
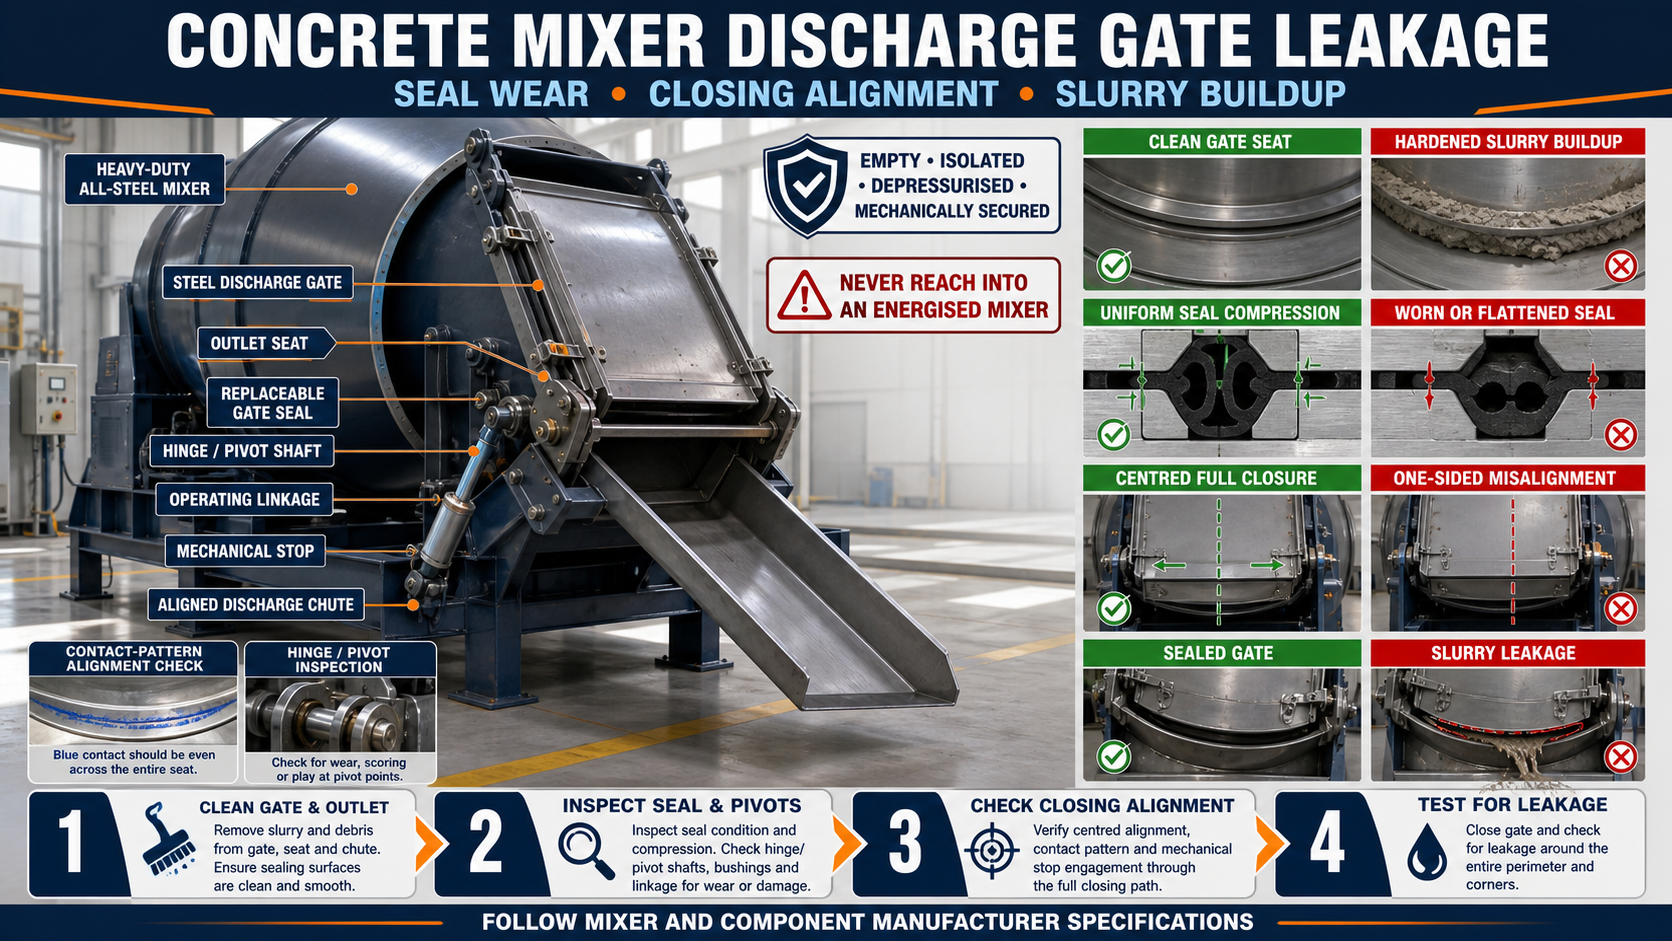
Concrete Mixer Discharge Gate Leakage: Seal Wear, Closing Alignment and Slurry Buildup Guide
Concrete Mixer Discharge Gate Leakage: Seal Wear, Closing Alignment and Slurry Buildup Guide
The discharge gate controls the release of mixed concrete from a concrete mixer into a trolley, bucket or other approved transfer system.
When the gate does not close correctly, water, cement paste or wet concrete may leak from the mixer. Even a small leak can cause material loss, floor contamination, inconsistent batch proportions and accelerated component wear.
Regular inspection of the gate plate, sealing surfaces, hinges, shafts and operating mechanism helps maintain controlled discharge and reliable precast production.
What Is a Concrete Mixer Discharge Gate?
A discharge gate is the movable steel closure installed at the mixer outlet.
Depending on the mixer design, it may use:
• Sliding gate • Hinged flap gate • Segment-type gate • Curved gate • Tilting outlet arrangement • Manual lever • Mechanical linkage • Pneumatic actuator • Hydraulic cylinder • Geared operating mechanism
The gate should open sufficiently for controlled discharge and close against its designed sealing surfaces.
Functions of the Discharge Gate
The discharge gate helps:
• Retain materials during mixing • Prevent premature concrete loss • Control discharge timing • Direct concrete into the receiving equipment • Reduce plant-floor spillage • Maintain batch consistency • Support safe production flow • Allow complete mixer emptying
The gate should not be used as an uncontrolled method of adjusting concrete consistency.
Common Signs of Gate Leakage
Discharge-gate leakage may appear as:
• Water dripping before mixing begins • Cement slurry escaping during mixing • Wet concrete collecting below the outlet • Hardened concrete around the gate • A visible gap at one side • Gate not reaching its closed position • Repeated actuator cycling • Reduced batch quantity • Irregular discharge • Concrete fins around the sealing edge • Increased operating force • Unusual noise during closing
Leakage should be investigated before buildup makes the problem worse.
Types of Discharge-Gate Leakage
Water Leakage
Water may escape through a very small gap before dry materials are fully mixed.
Cement-Slurry Leakage
Fine cement paste can pass through worn or misaligned sealing surfaces.
Aggregate Leakage
Small aggregate particles may become trapped in a larger gate gap.
Residual Dripping
Water or slurry remaining in the outlet may drip after discharge. This should be distinguished from active leakage during mixing.
Why a Mixer Discharge Gate Leaks
Common causes include:
• Hardened slurry on the sealing surface • Worn gate seal • Damaged seal carrier • Bent gate plate • Incorrect closing alignment • Worn hinge pin or shaft • Loose linkage • Damaged actuator mounting • Foreign material trapped in the joint • Excessive bearing clearance • Loose fasteners • Cracked welds • Worn mechanical stop • Incorrect adjustment • Previous impact damage
Several causes may exist at the same time.
Role of the Gate Seal
The gate seal helps close the small clearance between the discharge opening and movable gate.
Depending on the mixer design, the sealing arrangement may include:
• Replaceable rubber seal • Polymer sealing strip • Machined metal-to-metal seat • Flexible wiper • Project-specific gasket • Adjustable seal carrier • Curved contact ring
The replacement material and installation procedure should follow the mixer manufacturer’s specification.
Signs of Seal Wear
A gate seal may require attention when it shows:
• Cuts • Cracks • Permanent flattening • Hardened surface • Missing sections • Uneven compression • Pulled or displaced areas • Chemical deterioration • Concrete embedded in the seal • Separation from the seal carrier
Replacing a seal without correcting gate misalignment may cause rapid repeat wear.
What Is Closing Alignment?
Closing alignment describes how accurately the gate enters its fully closed position and contacts the sealing surface.
Correct alignment requires:
• Gate plate centred on the outlet • Uniform contact around the sealing perimeter • Linkage moving through the designed path • Hinges or shafts remaining aligned • Actuator stroke ending correctly • Mechanical stops being correctly positioned • No obstruction from hardened concrete
The gate should not depend on excessive actuator force to overcome poor alignment.
Symptoms of Incorrect Closing Alignment
Common symptoms include:
• One side closes before the other • Seal compression is unequal • A visible gap remains • Gate rubs against the housing • Closing movement is jerky • Linkage reaches an angle or binds • Actuator remains loaded after closure • Gate reopens slightly • Leakage occurs at the same corner • Seal wears faster on one side
These symptoms should be checked in an empty, isolated machine.
What Is Slurry Buildup?
Slurry buildup is hardened cement paste or concrete collected around the discharge opening, gate plate, hinges or linkage.
Buildup develops when:
• Leakage is not cleaned promptly • The mixer is washed incorrectly • Concrete remains after production • Gate corners are difficult to access • The seal already contains a gap • Drainage around the outlet is poor • Maintenance is delayed
Fresh slurry is easier to remove than hardened concrete.
How Slurry Buildup Affects the Gate
Hardened buildup can:
• Prevent complete closure • Damage the seal • Increase operating force • Jam the linkage • Restrict discharge • Cause gate misalignment • Increase leakage • Overload an actuator • Wear pivot points • Create falling debris • Contaminate future batches
Adding more closing pressure is not a substitute for cleaning the gate.
Preparing for Gate Inspection
A mixer discharge gate contains pinch, crush and stored-energy hazards.
Before inspection:
• Empty the mixer completely • Stop the machine • Isolate electrical power • Apply the plant’s lockout procedure • Release hydraulic or pneumatic pressure • Secure the drum or mixing unit • Mechanically block the gate against movement • Confirm zero stored energy • Clean the surrounding floor • Wear suitable protective equipment • Follow the mixer manufacturer’s instructions
Never enter or reach into a mixer that has not been properly isolated.
Do Not Rely Only on an Actuator
A hydraulic or pneumatic actuator is not a mechanical safety support.
During maintenance:
• Use the approved gate-support device • Block gravity-operated components • Keep hands clear of the closing path • Prevent control-system activation • Verify that stored pressure is released • Display appropriate maintenance warning
Unexpected gate movement can cause serious injury.
Cleaning the Discharge Gate
A general cleaning process may include:
1. Isolate the Mixer
Confirm that all energy sources are controlled.
2. Mechanically Secure the Gate
Prevent unexpected movement.
3. Remove Loose Material
Clear loose aggregate and fresh slurry using suitable tools.
4. Soften Approved Deposits Where Permitted
Follow the plant’s cleaning procedure and chemical restrictions.
5. Clean the Gate Plate
Remove buildup without damaging the forming or sealing surface.
6. Clean the Seal and Carrier
Inspect all corners and recesses.
7. Clean Hinges and Linkages
Remove concrete that restricts movement.
8. Inspect After Cleaning
Look for wear that was hidden by buildup.
Do not use uncontrolled impact that can bend the gate or damage the seal carrier.
Avoid Damaging the Sealing Surface
Aggressive cleaning can create scratches, dents or sharp edges.
Avoid:
• Heavy hammering • Cutting into the gate plate • Using unsuitable chisels • Excessive grinding • Heating the gate • Damaging the seal groove • Striking actuator rods • Directing high-pressure cleaning into sensitive components
Cleaning methods should suit the mixer design.
Visual Gate Inspection
After cleaning, inspect:
• Gate plate • Outlet housing • Seal • Seal carrier • Hinges • Pivot shaft • Bushes • Mechanical stops • Linkage arms • Pins and fasteners • Actuator mounting • Welds • Discharge chute
Record leakage and wear locations.
Checking Gate-Plate Flatness
A bent or distorted gate may not seal uniformly.
Suitable inspection methods may include:
• Verified straightedge • Feeler gauges • Approved profile template • Surface-contact check • Manufacturer-specified fixture
Check:
• Centre of the gate • Both sides • Leading and trailing edges • Curved profile where applicable • Areas near actuator connection • Previous repair locations
Acceptance requirements should come from the machine manufacturer.
Checking the Outlet Seat
The fixed outlet seat must also be inspected.
Look for:
• Concrete buildup • Wear grooves • Dents • Cracks • Loose sections • Corrosion • Seal-carrier damage • Uneven contact • Distortion after repair
A new gate seal cannot compensate for a severely damaged seating surface.
Checking Gate Alignment
With the empty machine isolated and using an approved controlled procedure:
• Observe the gate’s movement path • Check whether both sides move together • Confirm the gate remains centred • Inspect hinge or guide clearance • Verify linkage alignment • Check the final closed position • Inspect mechanical-stop contact • Confirm uniform seal compression • Check for rubbing or binding
Keep personnel clear while controlled movement is performed.
Using a Contact Pattern Check
An approved removable marking medium may help identify gate-to-seat contact.
A contact check may reveal:
• Full uniform contact • One-sided contact • Isolated high points • Missing contact zones • Distorted gate profile • Incorrect stop position • Local buildup
The marking material should not contaminate the mixer or future concrete.
Inspecting Hinge Pins and Bushes
Worn pivots can allow the gate to sag or move sideways.
Check for:
• Excessive clearance • Uneven wear • Bent pins • Worn bushes • Loose retaining hardware • Cracked hinge brackets • Misaligned supports • Poor lubrication • Concrete contamination
A worn hinge can create recurring leakage even after seal replacement.
Inspecting the Mechanical Linkage
The linkage transfers movement from the handle or actuator to the gate.
Inspect:
• Link arms • Clevises • Pivot pins • Retaining clips • Adjustment points • Mounting brackets • Bushes • Threaded connections • Welds • Mechanical stops
Loose linkage may prevent the gate from reaching a repeatable closed position.
Hydraulic and Pneumatic Actuators
Where the gate uses an actuator, inspect:
• Cylinder mounting • Rod alignment • Pin condition • Hose or air-line routing • External leakage • Stroke completion • Control-valve operation • End-position sensing where provided • Mounting-bracket cracks
Do not increase system pressure to force a misaligned gate closed.
Checking Mechanical Stops
A mechanical stop establishes the designed gate position.
A worn or incorrectly adjusted stop may cause:
• Incomplete closure • Excessive seal compression • Gate-plate bending • Actuator overload • Repeated linkage wear • Inconsistent closing position
The stop should be adjusted only according to approved specifications.
Seal Replacement Procedure
The exact procedure depends on the mixer design. A general process may include:
1. Identify the Approved Replacement Seal
Match the profile, material and installation arrangement.
2. Isolate and Secure the Gate
Apply lockout and mechanical support.
3. Remove the Old Seal
Avoid damaging the carrier.
4. Clean the Seal Groove
Remove concrete, adhesive and corrosion.
5. Inspect the Carrier
Repair approved defects before installation.
6. Install the New Seal
Avoid stretching, twisting or uneven compression.
7. Join Seal Ends as Specified
Do not create an unsupported gap or overlap.
8. Reassemble the Gate
Confirm all fasteners and retainers.
9. Check Alignment
Verify gate position before applying full operating force.
10. Conduct a Controlled Leakage Test
Use the manufacturer’s approved procedure.
Never install an unverified seal simply because it appears to fit.
Why New Seals Sometimes Leak
A replacement seal may continue leaking when:
• Gate plate is bent • Outlet seat is damaged • Seal profile is incorrect • Seal was stretched during installation • Carrier is distorted • Joint ends are incorrect • Gate is off-centre • Mechanical stop is misadjusted • Hinge pins are worn • Concrete remains behind the seal
The complete gate system should be inspected.
Controlled Leakage Testing
After maintenance, perform the approved test with the mixer empty and safely configured.
A general staged check may include:
• Dry movement test • Gate-contact inspection • Low-risk water-retention check where permitted • Observation of the complete sealing perimeter • Controlled opening and discharge • Reinspection after operation
Do not begin full production until the gate operates correctly.
Pressure-Loss and Closing Problems
On hydraulic or pneumatic systems, a gate may fail to close because of:
• Low system pressure • Internal cylinder leakage • External line leakage • Restricted hose or air line • Contaminated control valve • Incorrect flow setting • Bent linkage • Mechanical binding • Faulty position sensor • Worn actuator mounting
Hydraulic or pneumatic diagnosis should be performed by trained personnel.
Discharge Chute Alignment
The discharge chute should direct concrete into the intended receiving equipment.
Inspect:
• Chute position • Chute slope • Mounting bolts • Structural supports • Slurry buildup • Wear plate • Cracks • Interference with the gate • Alignment with the concrete trolley or bucket
A misaligned chute can create spillage even when the gate itself seals correctly.
Mixer Batch Consistency and Gate Leakage
Gate leakage may alter the batch by allowing:
• Water loss • Cement-paste loss • Fine-material loss • Premature concrete discharge
This can affect:
• Workability • Yield • Uniformity • Surface finish • Compaction • Production records
A leaking gate should not be treated only as a housekeeping issue.
Daily Inspection Checklist
Before production:
• Check the floor below the outlet • Inspect the gate for visible gaps • Confirm the gate closes smoothly • Inspect the seal where accessible • Check linkage and pins • Inspect actuator connections • Confirm mechanical-stop condition • Check the discharge chute • Remove old slurry • Conduct the approved functional check
Report active leakage before loading the mixer.
End-of-Shift Cleaning Checklist
After production:
• Empty the mixer • Apply isolation procedure • Secure the gate • Remove fresh concrete • Clean the outlet seat • Clean the gate plate • Clean seal edges • Clear hinge and linkage areas • Clean the chute • Inspect for new damage • Follow approved wash-water management • Record maintenance requirements
Leaving fresh slurry overnight can create a serious closing problem during the next shift.
Preventive Maintenance Schedule
At planned intervals:
• Inspect seal condition • Check gate alignment • Measure approved pivot clearances • Inspect hinges and bushes • Check linkage wear • Inspect actuator mounting • Check mechanical stops • Examine gate plate flatness • Inspect outlet-seat condition • Check welds and stiffeners • Lubricate approved points • Replace worn components • Review leakage records
Maintenance frequency should reflect mixer usage and operating conditions.
Common Maintenance Mistakes
Tightening the Gate Without Cleaning
Hardened concrete may remain trapped and damage the seal.
Increasing Hydraulic Pressure
Extra pressure may overload the actuator, linkage or gate plate.
Replacing Only the Seal
Misalignment or pivot wear may destroy the new seal quickly.
Using Excessive Hammering
Impact can bend the gate and worsen leakage.
Ignoring Small Drips
A small leak can develop into hardened buildup and a larger gap.
Cleaning While the Mixer Is Energised
This exposes workers to serious rotating and crushing hazards.
Using an Incorrect Seal
An unsuitable profile or material may fail rapidly.
Grinding the Gate Without Measurement
Uncontrolled grinding can permanently change the sealing geometry.
Troubleshooting Common Gate Problems
Problem: Leakage Occurs at One Corner
Possible causes:
• Local slurry buildup • Bent gate corner • Uneven seal compression • Worn hinge • Misadjusted stop • Damaged seal section
Problem: Leakage Occurs Around the Complete Gate
Possible causes:
• Seal is worn • Gate does not reach the seat • Incorrect seal profile • Linkage is loose • Actuator stroke is incomplete • Mechanical stop prevents closure
Problem: Gate Closes Slowly
Possible causes:
• Slurry buildup • Mechanical binding • Worn pivot • Restricted hydraulic or pneumatic line • Control-valve problem • Bent linkage
Problem: Gate Closes but Reopens Slightly
Possible causes:
• Linkage geometry is incorrect • Actuator has internal leakage • Mechanical lock is worn • Material is trapped in the joint • Stop position is incorrect
Problem: Gate Opens With a Sudden Jerk
Possible causes:
• Hardened concrete has bonded the gate • Linkage is binding • Pivot lubrication is inadequate • Actuator control is incorrect • Gate plate is rubbing against the housing
Problem: Concrete Does Not Discharge Completely
Possible causes:
• Gate opening is restricted • Chute contains buildup • Linkage stroke is insufficient • Gate is distorted • Concrete workability is unsuitable • Mixer contains internal buildup
Benefits of Proper Gate Maintenance
Correct maintenance provides:
• Reduced cement-slurry loss • Cleaner production floor • More consistent batch yield • Smooth discharge control • Lower seal wear • Reduced actuator load • Fewer unexpected stoppages • Easier end-of-shift cleaning • Longer mixer-component life • Improved precast production efficiency
Conclusion
Concrete mixer discharge-gate leakage commonly begins with slurry buildup, worn seals, misaligned gate plates, damaged pivots or incorrect mechanical-stop adjustment.
A reliable inspection should cover the complete discharge system, including the gate, outlet seat, seal, hinge pins, linkage, actuator and chute. Replacing the seal alone will not provide a lasting repair if the gate remains distorted or incorrectly aligned.
Regular cleaning and preventive maintenance of an all-steel concrete mixer discharge system help control material loss, maintain batch consistency and reduce unplanned production downtime.